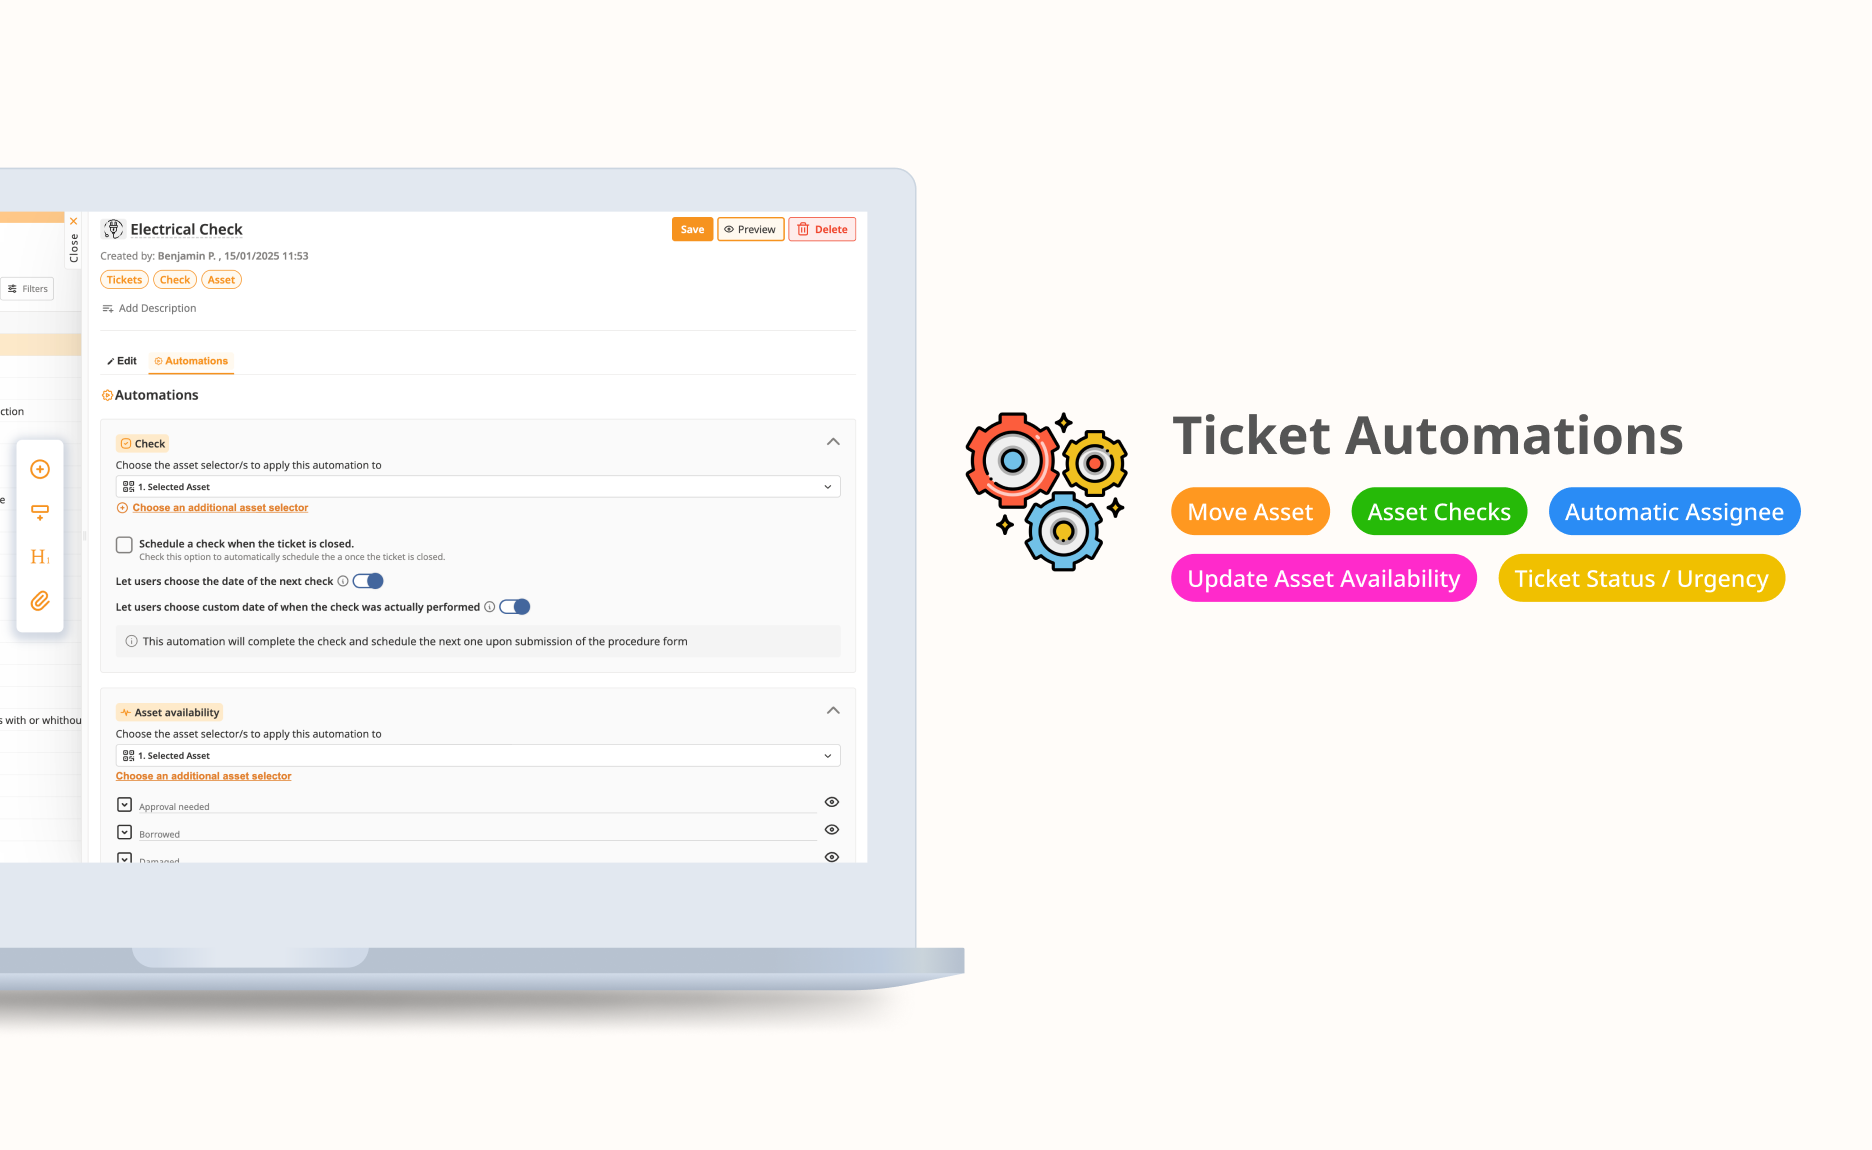
Procedure forms in ToolSense now include automations that automatically update ticket properties and asset statuses based on the settings you define. When you submit a ticket, these automations trigger immediately to streamline your workflow.
 Getting Started with Automations
To add configure ticket automations in ToolSense:
Open your procedure in the Procedure Page.
Navigate to the Automations tab.
Select and configure the desired automations according to your workflow requirements.
Save your changes to apply these settings to future ticket submissions
 ️ Available Automations
 Asset Availability: Updates the availability status of an asset upon ticket submission or closure. Optionally, allow users to select asset availability manually within the form.
 Assignee: Automatically assigns tickets to specific users, handlers, or teams. You can also allow users to select the assignee manually within the form.
 ️ Move Asset: Automatically moves assets to specified locations upon ticket submission or closure. Choose if the movement should occur immediately or only after closing the ticket.
 Ticket Status & Urgency: Set default ticket statuses and urgency levels, or provide users the option to select these directly within the form before submission
 (Asset) Checks: Automatically completes asset checks and schedules the next check upon ticket submission or closure. You can also allow users to manually select the next check date as well as when the check was actually performed, and the dates selected here will also be automatically updated in the asset check schedule. Additionally, you have the option to complete the check immediately and schedule the next one, or only schedule the next check upon ticket closure.
 In-depth Automation Configuration Guide: Asset Availability
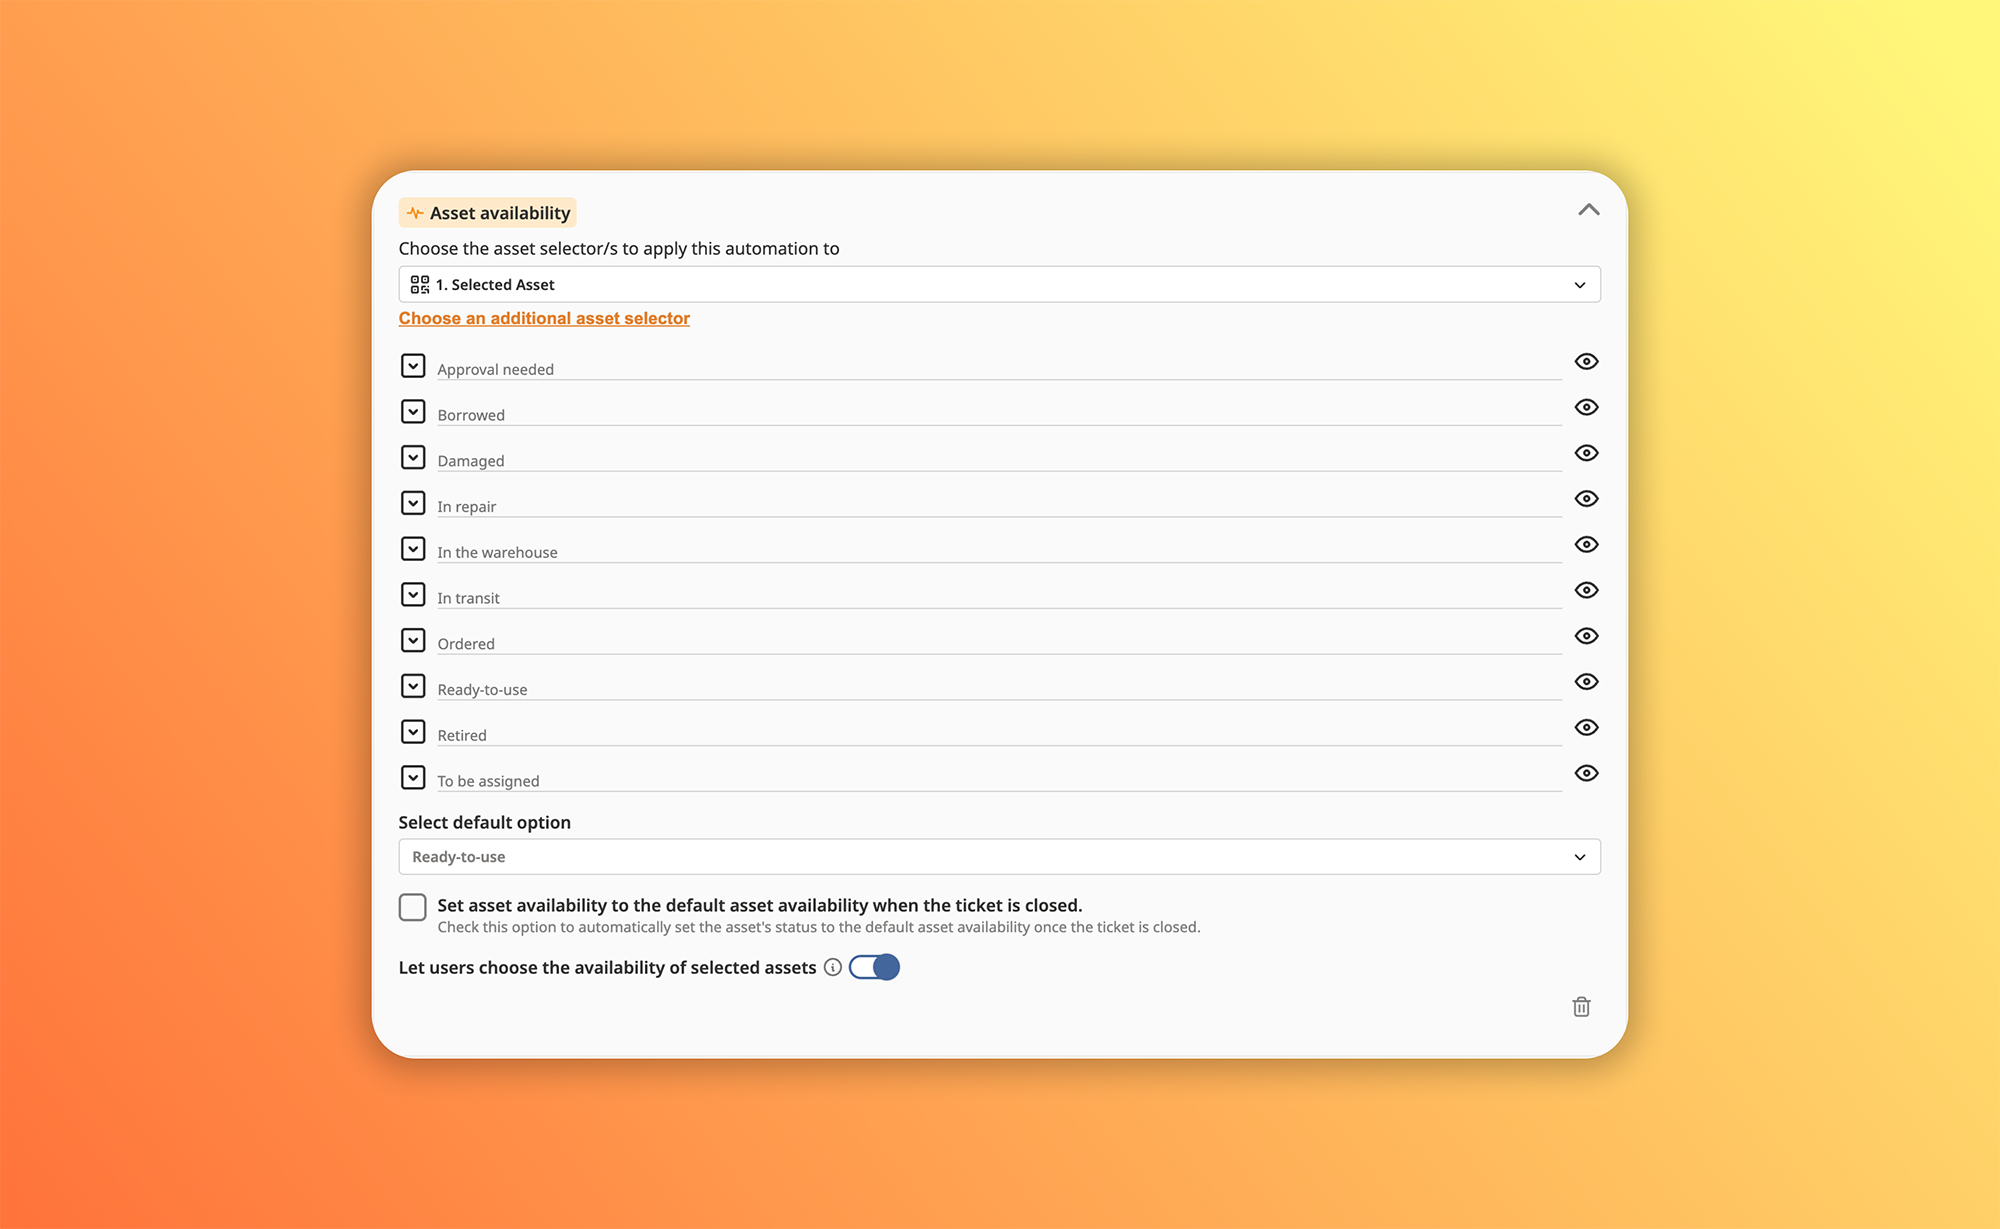
Open your procedure in the Procedures page.
Navigate to the Automations tab within the procedure builder.
Locate and select Asset Availability from the available automation options.
Choose the asset selector(s) to apply asset availability automation to. These asset selectors should be pre existing in the form build already.
Choose when you want the automation to update asset availability:
(Default) Upon Ticket Submission: Immediate update after submission.
(Via checkbox toggle) Upon Ticket Closure: Update only after closure.
(Optional) Enable the toggle to Allow users to manually select asset availability in the form.
If enabled, users submitting the form can select the asset's availability status directly.
If disabled, the predefined asset availability in step 5 will always apply automatically.
If users are allowed to explicitly select the asset availability, the asset availability selector will be available in the form build as well
You may select which availability options users can see and choose from.
After configuring your preferred settings, click Save to activate the automation.
 What happens upon automation trigger?
When triggered, the asset's availability status in ToolSense will automatically update according to the configured settings. If manual selection is enabled, the chosen availability by the user will override the default availability automation.
Assignee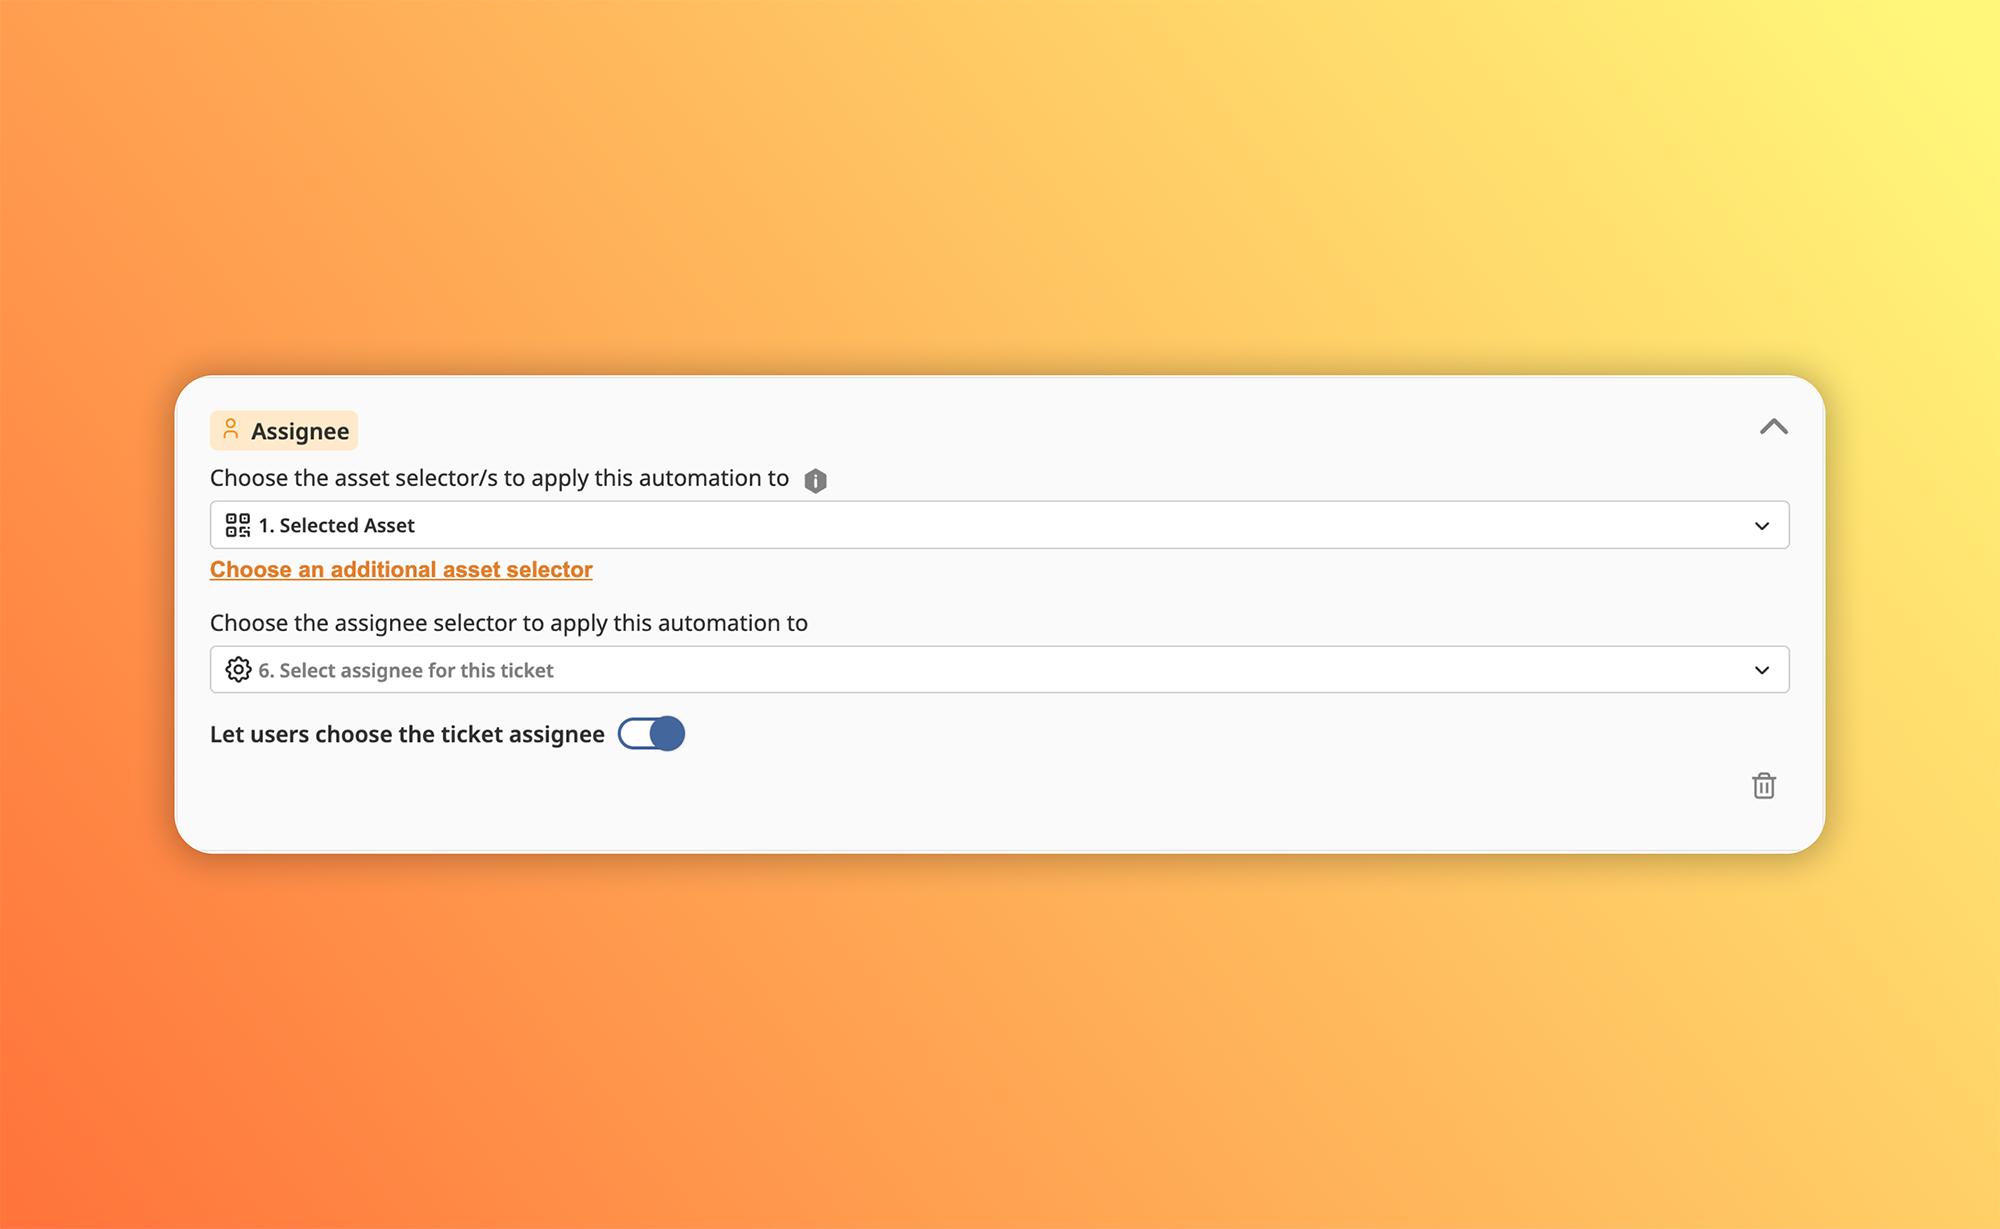
Open your procedure in the Procedures page.
Navigate to the Automations tab within the procedure builder.
Select Assignee from the available automation options.
Choose the asset selector(s) to apply this automation to. The asset selector identifies the relevant service partner based on the selected asset when "Suggested Service Partner" is chosen in service settings. Learn more here
Choose the assignee selector to apply this automation to. By default, the assignee selector is automatically added to the form build. If other participant selectors exist, they can be selected as assignee selector.
Optionally toggle “Let users choose the ticket assignee.”
Enabled: Users can manually select assignees from the form.
Disabled: The predefined assignee(s) are automatically applied.
Click Save to activate the automation.
 Detailed Behaviour of Assignee Automation
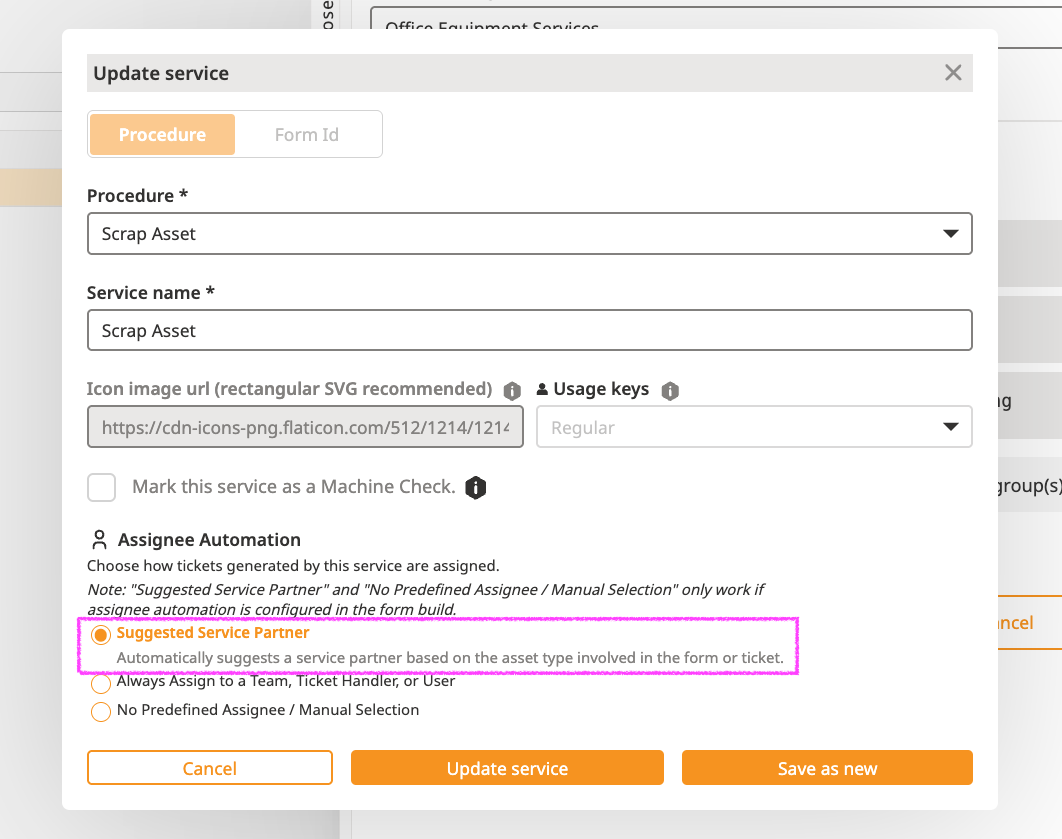
Suggested Service Partner:
If set, the suggested service partner linked to the asset type selected in the form will appear automatically.
Users can assign the ticket directly to the suggested partner or manually select another user, team, or handler from the dropdown.
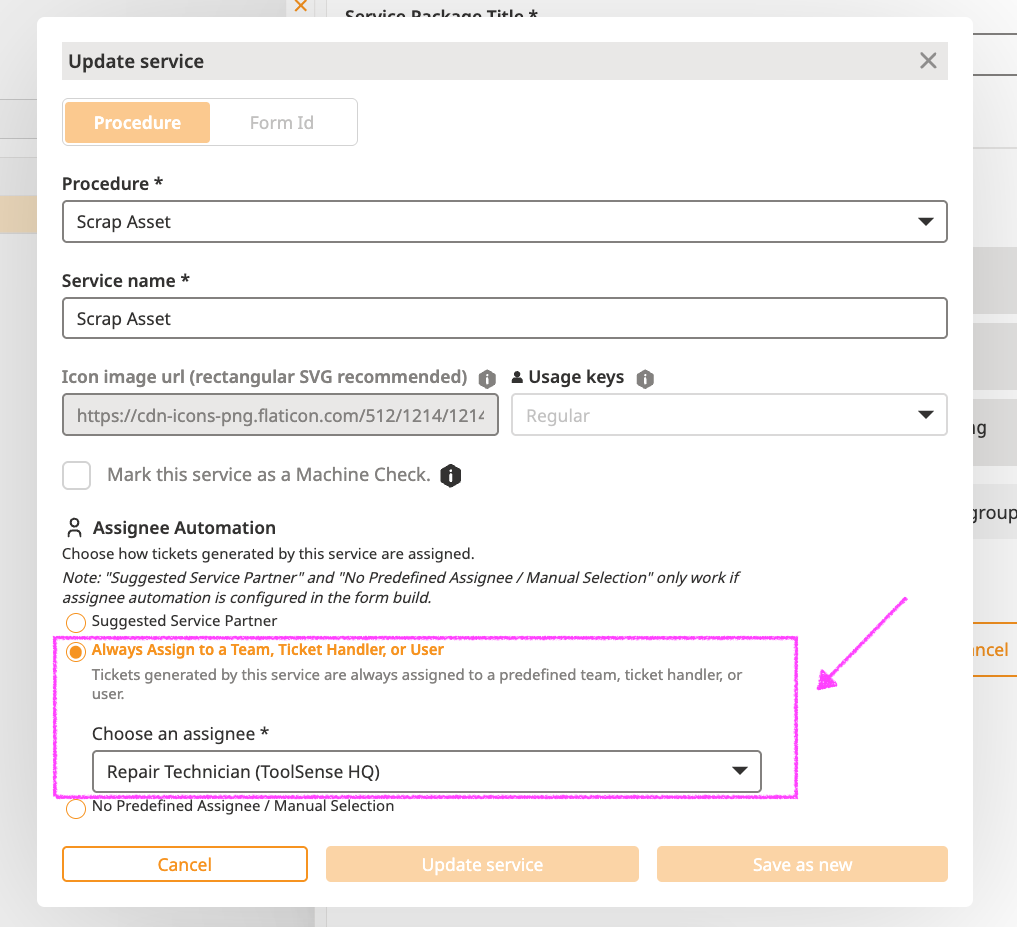
Always Assign to a Team, Ticket Handler, or User:
The ticket will automatically assign to the predefined user, team, or handler.
If "Let users choose the ticket assignee" is enabled, users can override the predefined selection and manually assign another user, team, or handler.
No Predefined Assignee / Manual Selection:
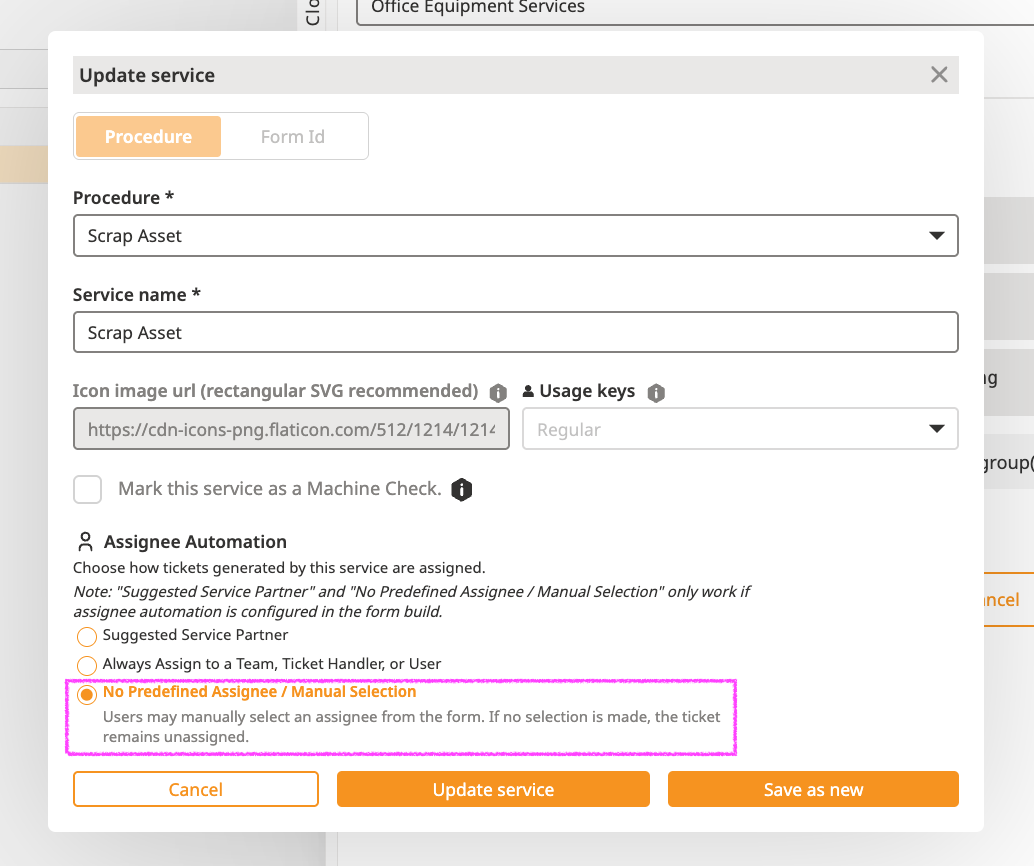
If assignee automation is not configured in the procedure form, the ticket remains unassigned and requires manual assignment afterward.
If assignee automation is set up in the procedure form and the toggle to "Let users choose the ticket assignee" is enabled, then users can manually select an assignee from the form. Watch 13-second video here
If assignee automation is set up in the procedure form and the toggle to "Let users choose the ticket assignee" is disabled, then users can manually select an assignee from the form. Watch 19-second video here
Move Asset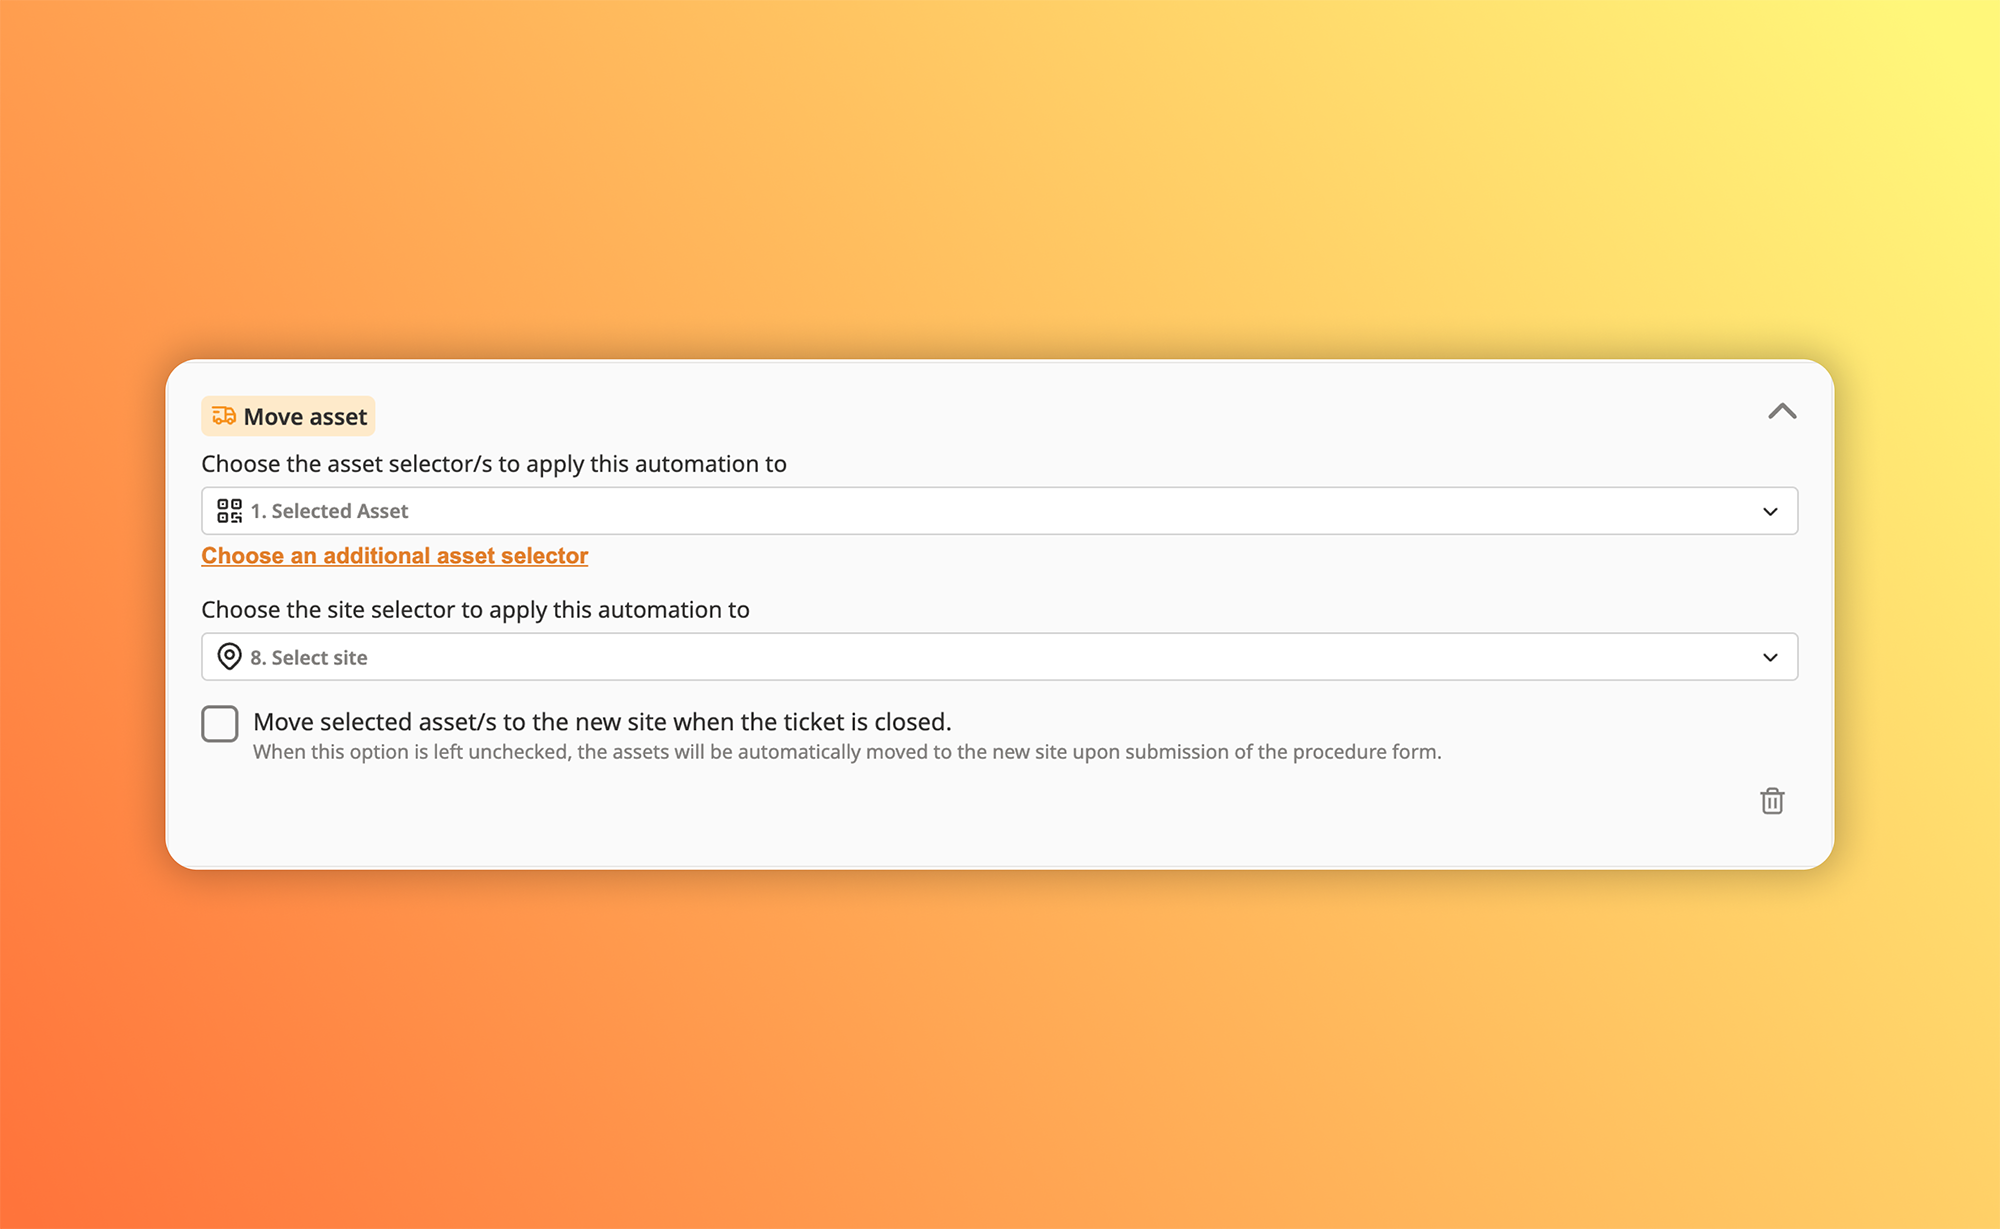
This automation automatically moves an asset to a specified location upon ticket submission or closure. Here's how to set it up:
Open your procedure
Go to the Procedures page in ToolSense.
Open the procedure you want to configure.
Navigate to Automations
Within the procedure builder, click on the Automations tab.
Select Move Asset
From the available automation options, choose Move Asset.
Choose asset selector(s)
Select the asset selector(s) you want this automation to apply to. Make sure these asset selectors already exist in your form build.
Choose the site selector you want to define the new location of the assets selected
If you don't have a pre-existing site selector in your form build, ToolSense automatically adds one for you.
If you already have a site selector in your form, make sure to select the correct one to apply this automation properly. The asset will automatically move to the location chosen via this site selector once the automation is triggered.
Set automation trigger
Choose when the automation should trigger the asset movement:
Upon Ticket Submission: The asset is moved right after the ticket is submitted.
Upon Ticket Closure: The asset will only move once the ticket has been closed.
Save your changes
Click Save to finalize and activate your Move Asset automation settings.
What happens upon automation trigger?When the automation triggers, the asset automatically moves to the location selected by the user filling out the form, based on the configured site selector.
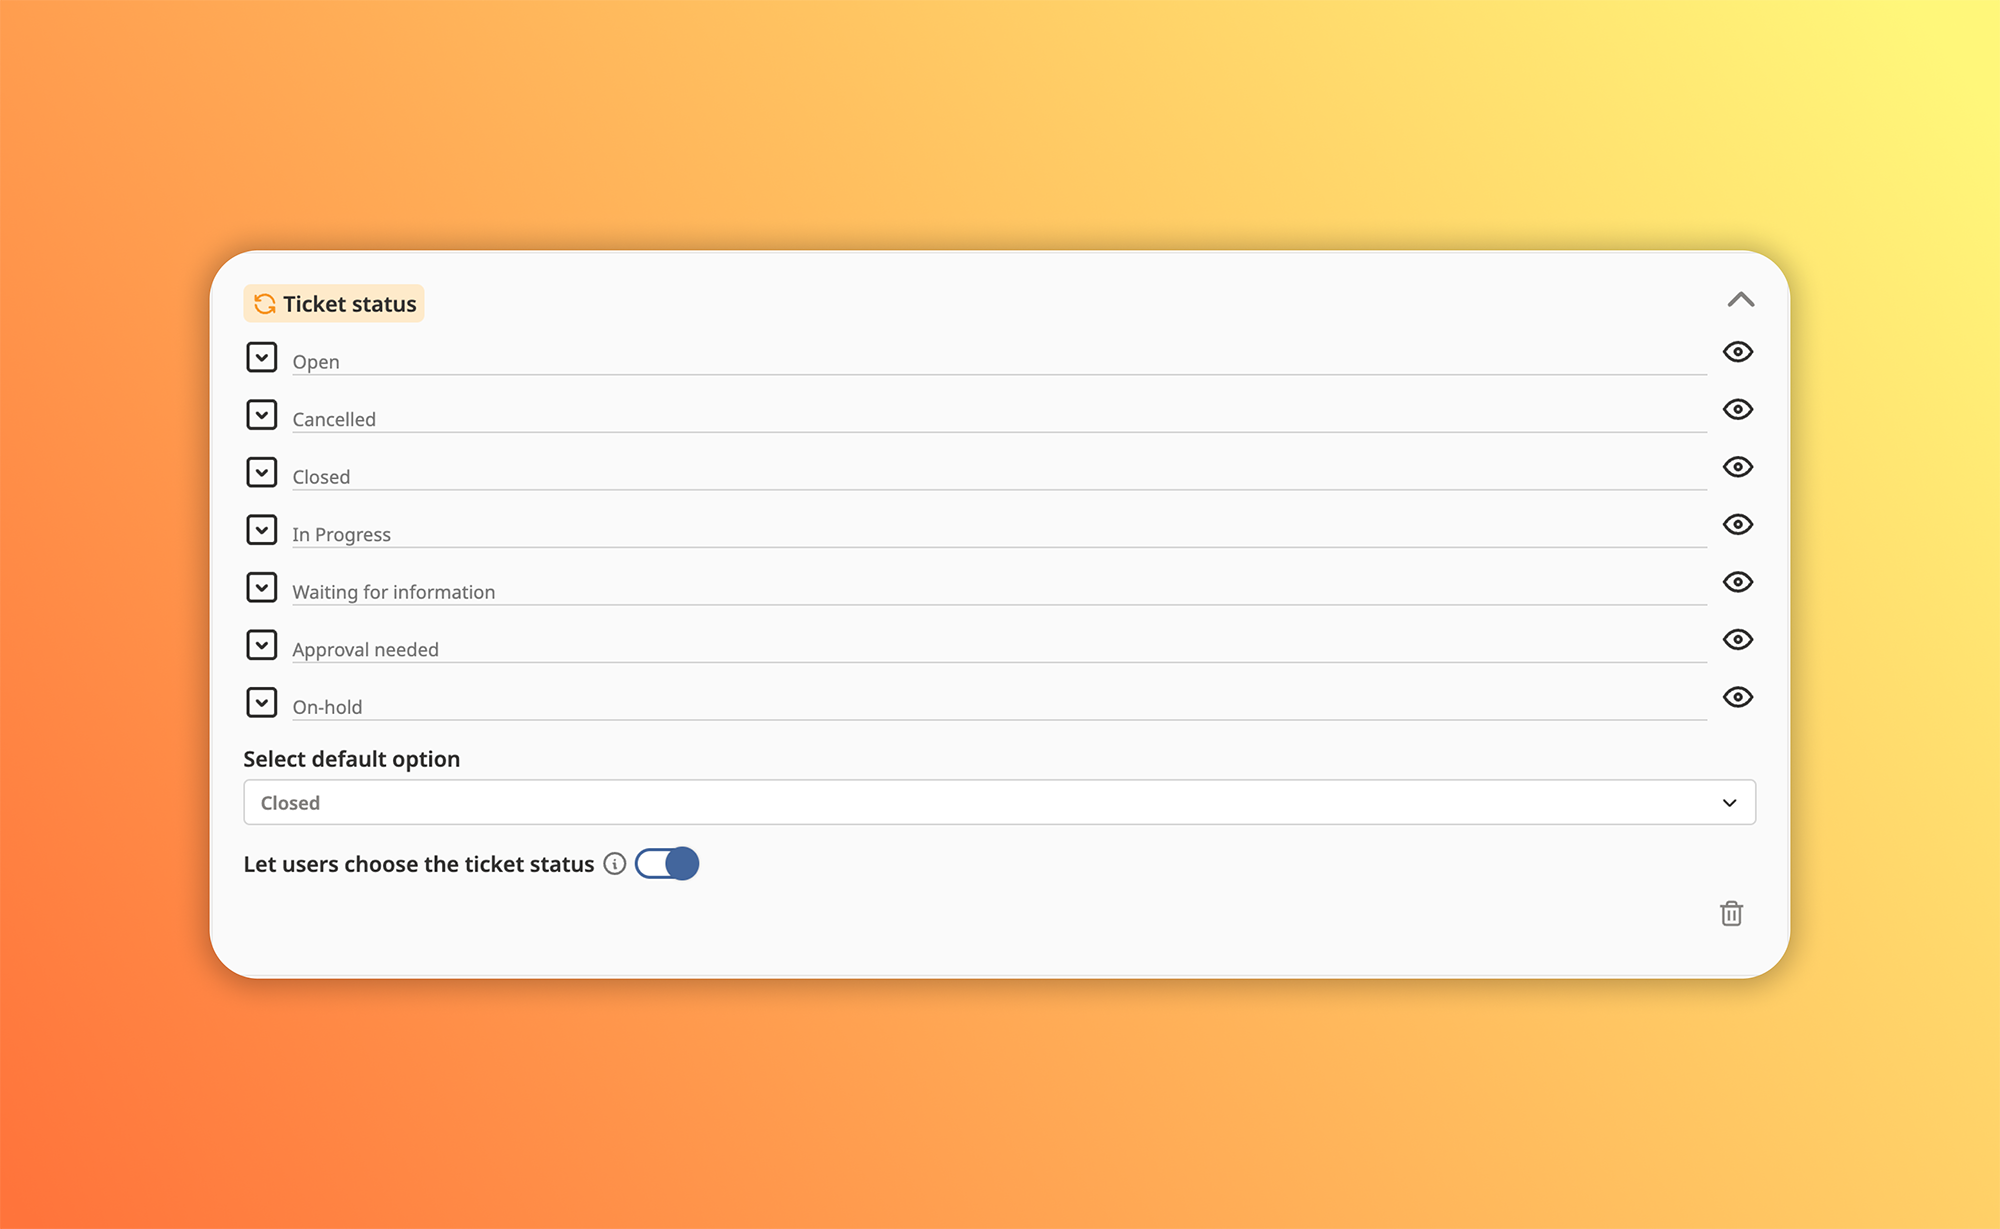
 Ticket Status
This automation allows you to set a default ticket status or let users select the status when submitting a form.
Open your procedure
Go to the Procedures page in ToolSense.
Select the procedure you want to configure.
Navigate to Automations
Open the Automations tab within the procedure builder.
Select Ticket Status
Choose Ticket Status from the available automation options.
Set the Default Ticket Status
Select the status you want tickets to be assigned upon submission (e.g., Open, In Progress, Approval Needed, Waiting for Information, On-hold, Closed, or Cancelled).
Allow users to select a ticket status (Optional)
If enabled, users filling out the form can manually choose the ticket status before submission.
If disabled, the default status will automatically apply.
Save your changes
Click Save to activate the Ticket Status automation.
What happens upon automation trigger?If user selection toggle is enabled, the selected status in the form will be applied to the ticket.
If disabled, the predefined default status will be assigned automatically.
️ Ticket Urgency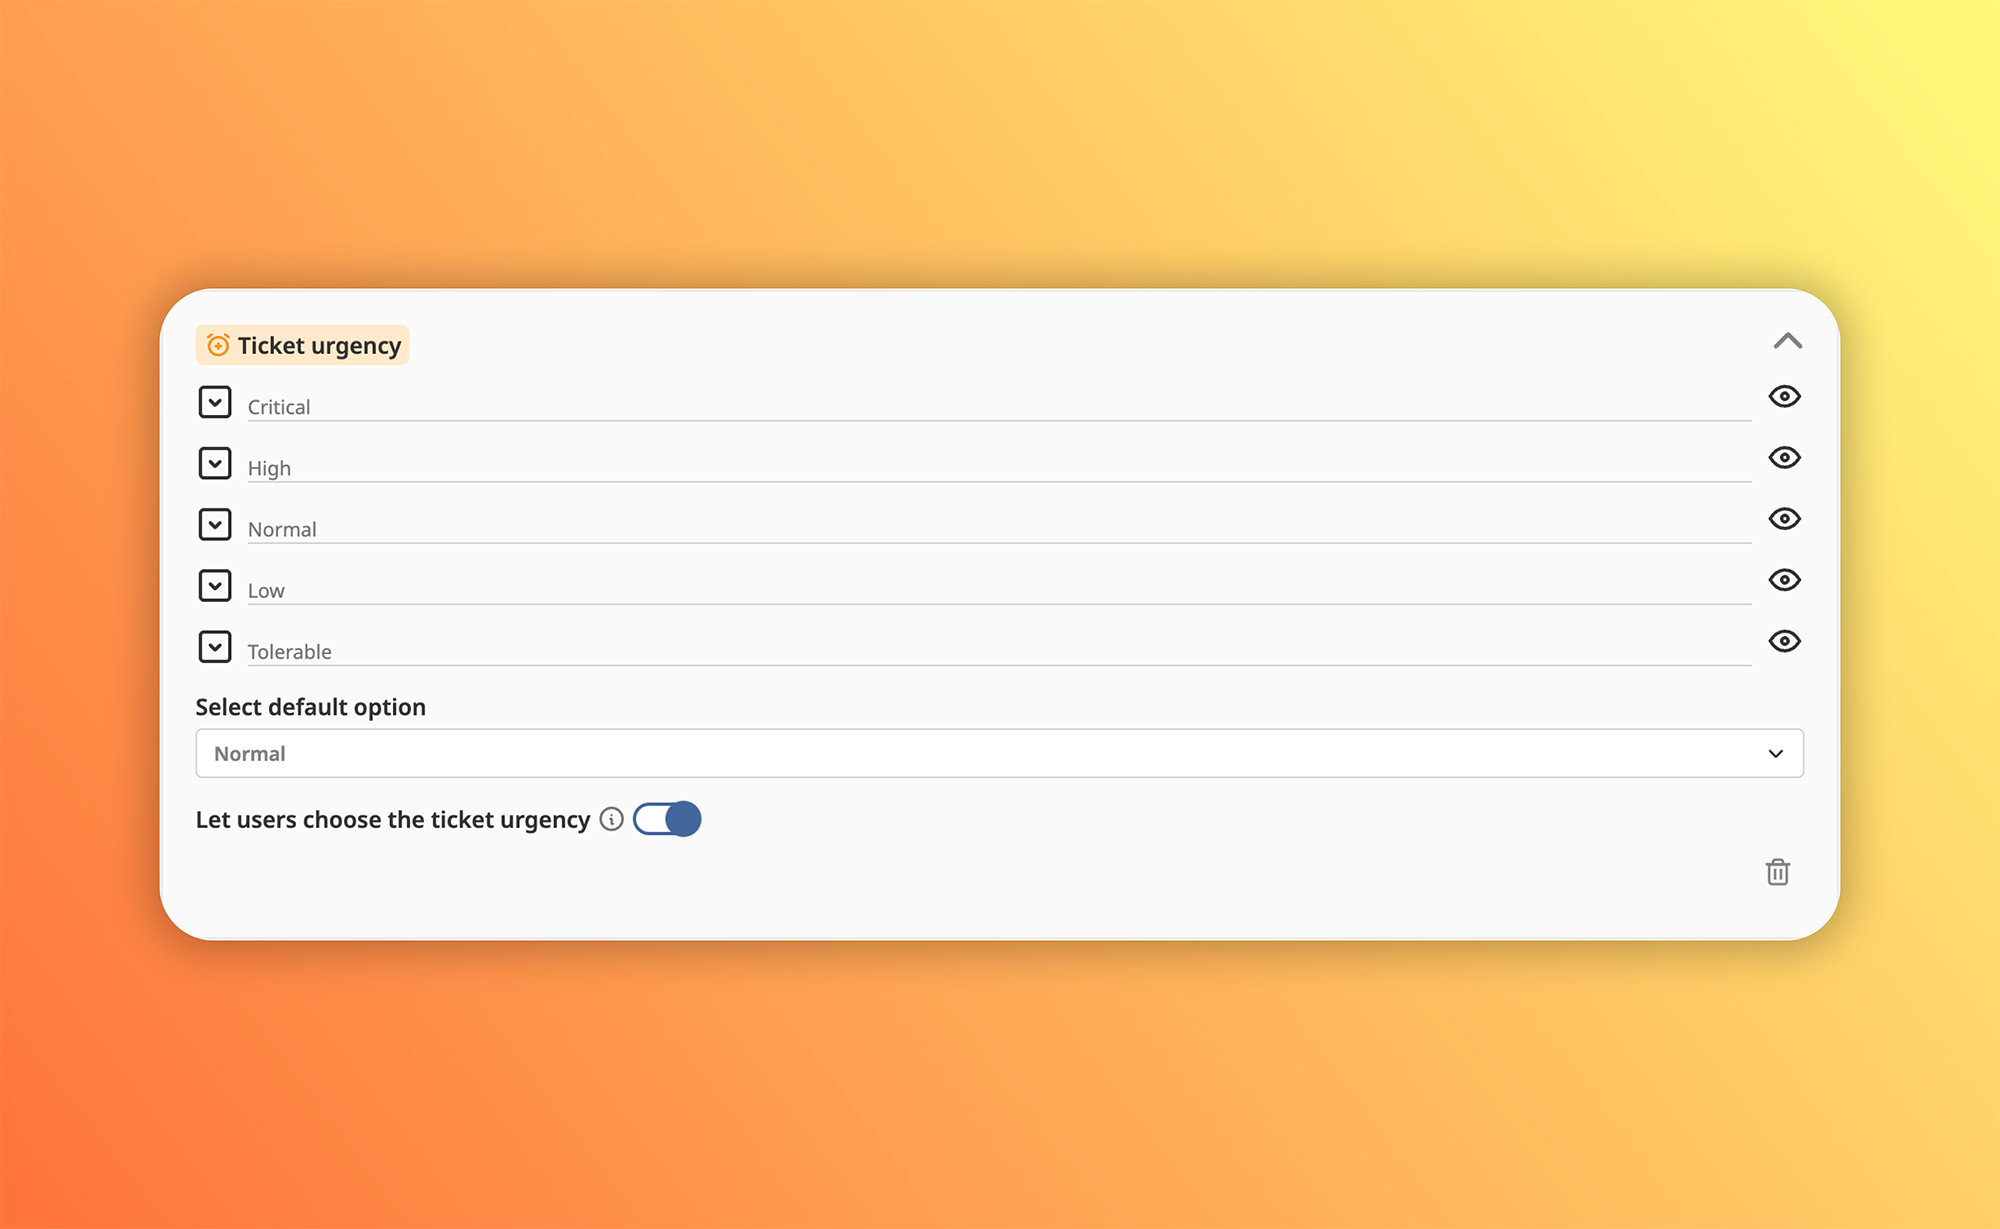
This automation assigns a default urgency level to tickets or allows users to choose one during form submission.
Open your procedure
Go to the Procedures page in ToolSense.
Open the procedure you want to configure.
Navigate to Automations
Open the Automations tab within the procedure builder.
Select Ticket Urgency
Choose Ticket Urgency from the available automation options.
Set the Default Urgency Level
Choose a default urgency level to apply to all tickets created via this form (Low, Medium, High, or Critical).
Allow users to select urgency (Optional)
If enabled, users submitting the form can manually choose the urgency level.
If disabled, the predefined default urgency level will automatically apply.
Save your changes
Click Save to activate the Ticket Urgency automation.
What happens upon automation trigger?If user selection toggle is enabled, the urgency selected in the form will apply to the ticket.
If disabled, the predefined urgency level will be automatically assigned.
Checks The Checks Automation allows you to automatically complete asset checks and schedule the next check upon submission of the ticket, reducing manual tracking and improving asset maintenance workflows.

Open your procedure
Navigate to the Procedures page in ToolSense.
Open the procedure you want to configure.
 Checks Automation can only be applied to procedures that are set as "Checks." This is a preset option when creating a new procedure. If your procedure is not configured as a Check, this automation will not be available.
Navigate to Automations
Open the Automations tab within the procedure builder.
 Note: The Checks Automation is automatically added to procedures that are set as Checks. However, you can still configure its settings as needed.
Choose the asset selector(s)
Select the asset selector(s) to apply this automation to. These selectors should already be part of your form build.
Define when the check should be completed
By default, the check is completed upon ticket submission.
If you prefer to complete the check only upon ticket closure, select the checkbox "Only complete the check and schedule the next one when the ticket is closed."
Set up the next check scheduling
Schedule the Next Check Automatically: The system will automatically set the next check date based on predefined intervals.
Let Users Select the Next Check Date (Optional):
If enabled, users submitting the form can manually select the next check date.
If disabled, the system applies the predefined schedule.
Allow users to mark when the check was performed (Optional)
By default, the system automatically schedules the next check after the check is completed. This scheduling is triggered upon ticket submission.
Let Users Select the Next Check Date (Optional):
If enabled, users submitting the form can manually select the next check date.
If disabled, the system applies the predefined schedule. To learn more about setting up asset checks, please check our guide here
Let Users Choose When the Check Was Actually Performed (Optional):
If enabled, users can select the actual date the check was performed, including past dates (for example, to backdate a check).
If disabled, the system will assume the check was performed on the ticket submission date.
Save your changes
Click Save to activate the Checks Automation.
What happens upon automation trigger?If the check completion is automated, the asset check is marked as completed based on the chosen trigger (ticket submission or closure).
If users manually select when the check was performed, the provided date updates the asset check record.
If next check scheduling is enabled, the system assigns the next check date based on predefined rules or the user’s manual selection.

 How automations are displayed on the ticket details, PDF, Email
Once the ticket is logged in the platform, all automations that happened upon submission will also be logged in the ticket details. Automations would have it’s own section under the ticket summary section as well as in the activity log of the ticket
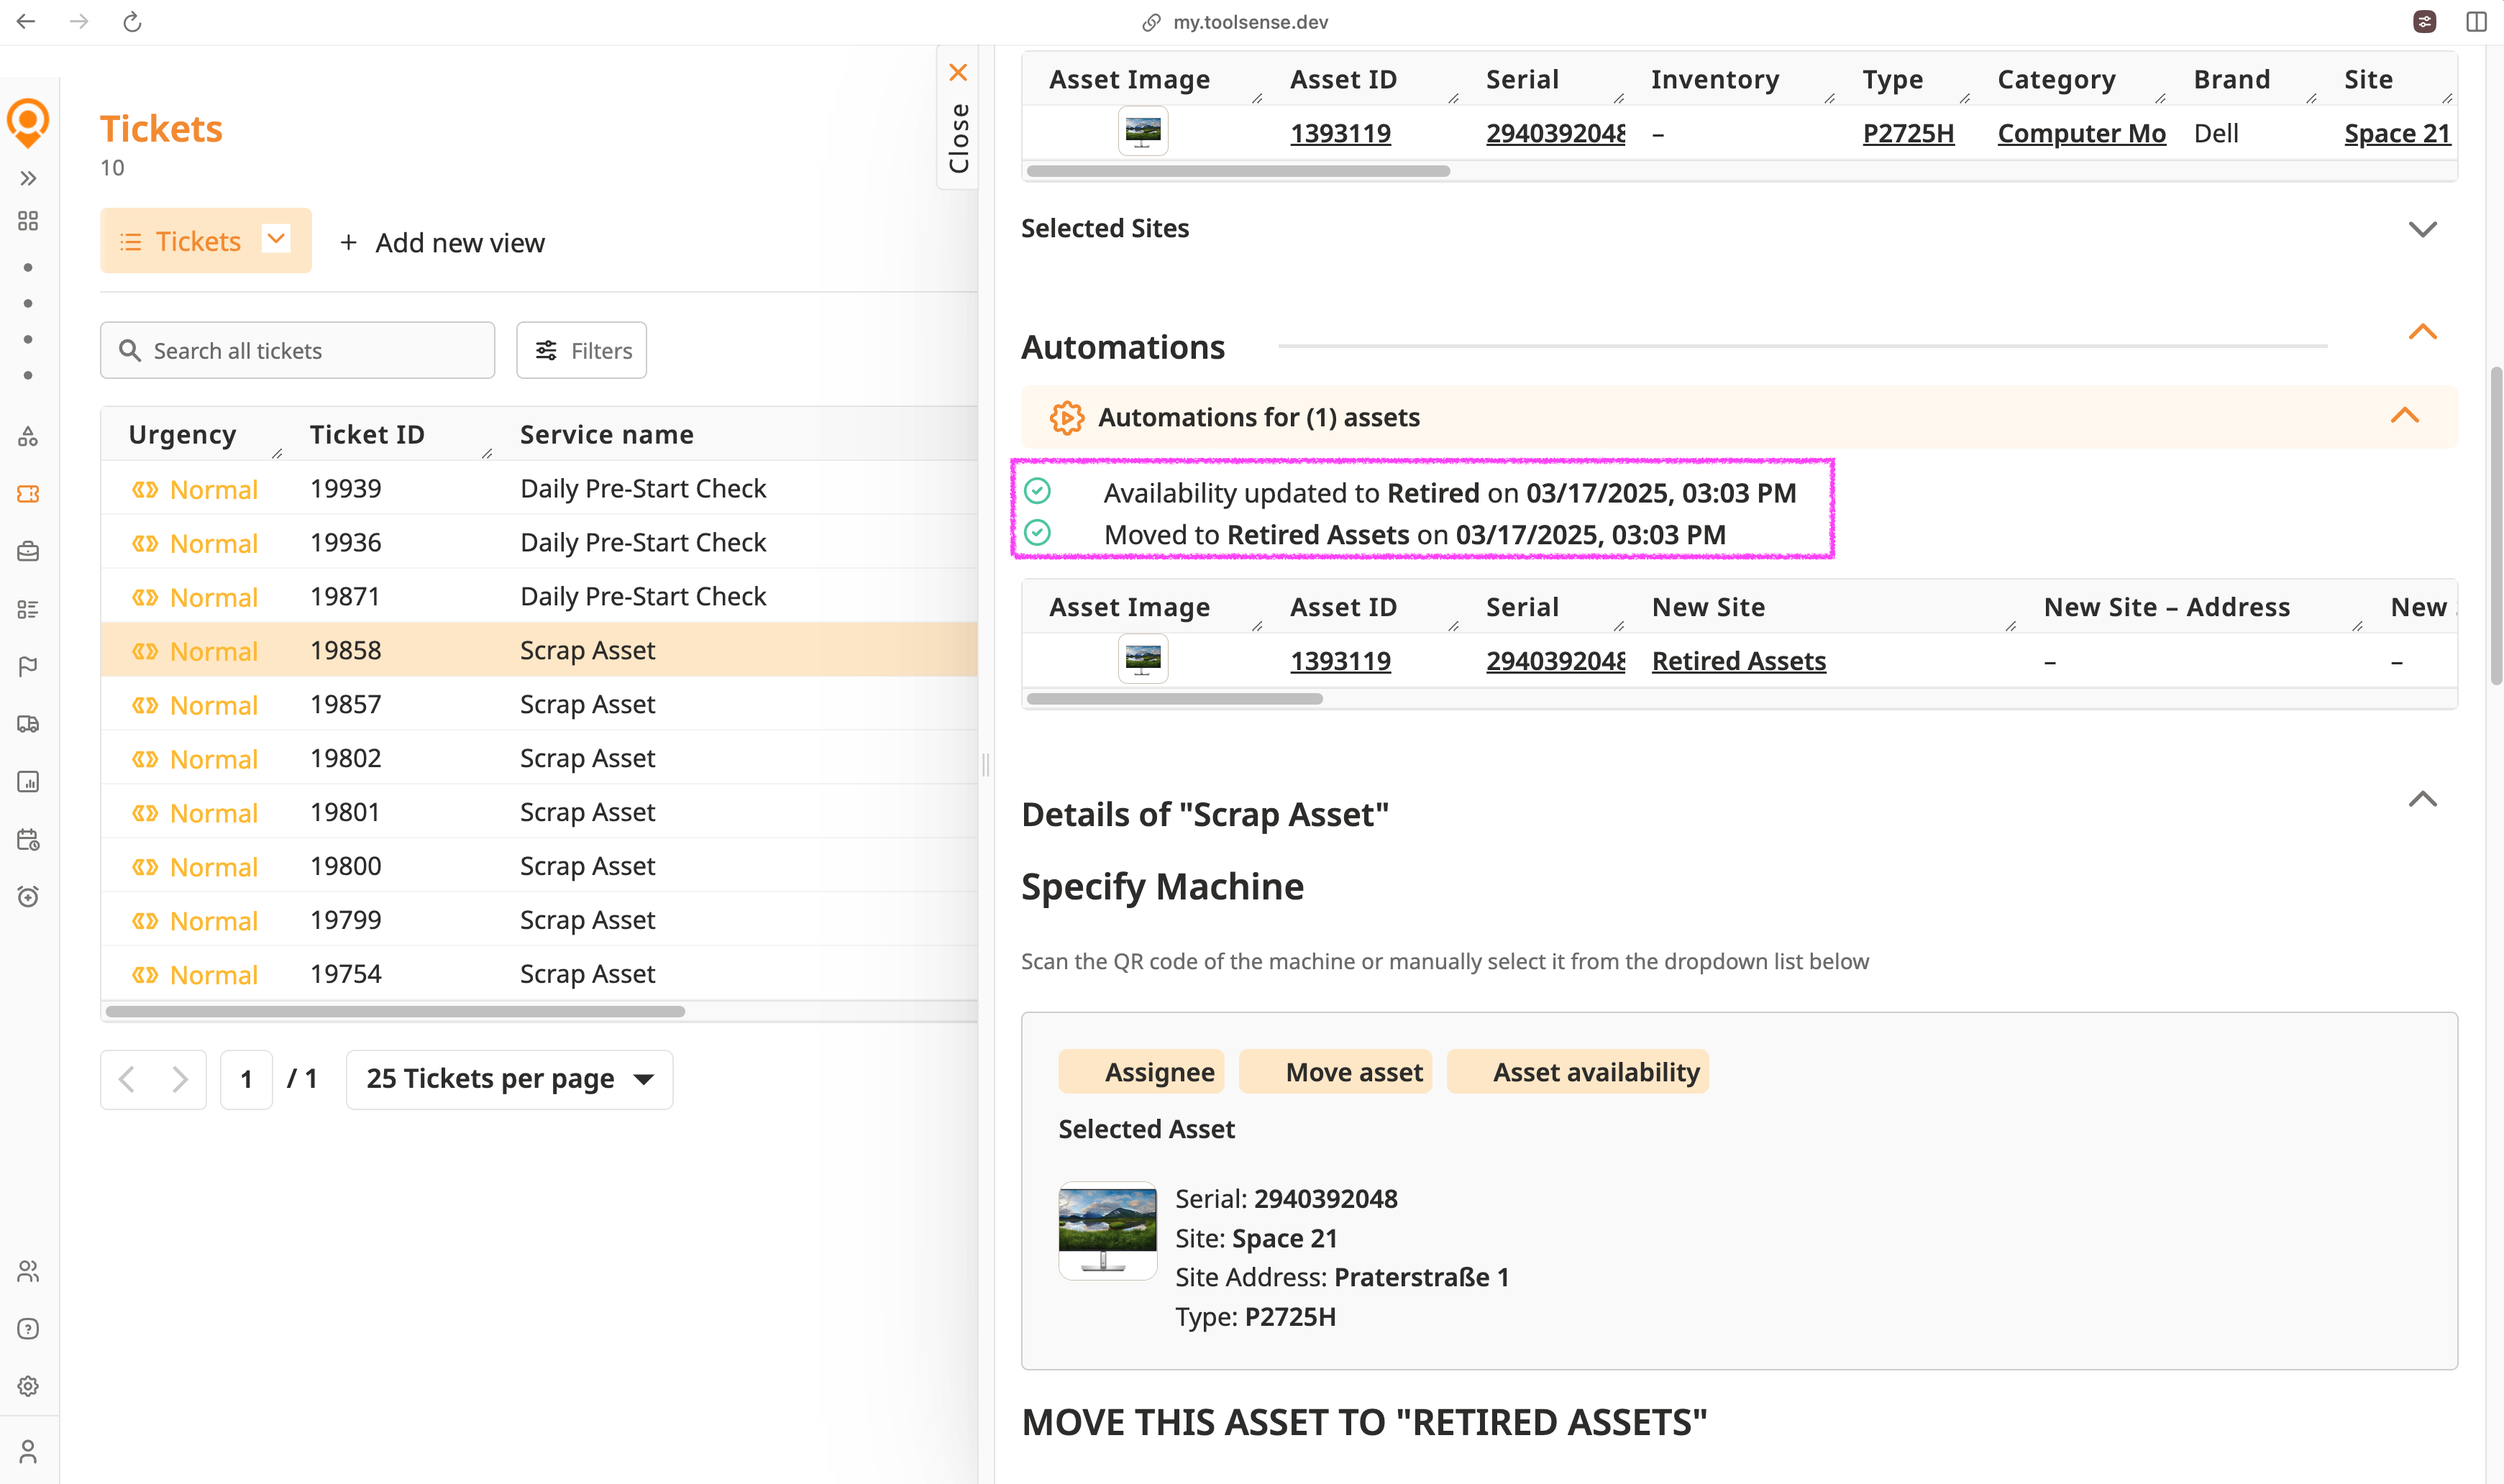
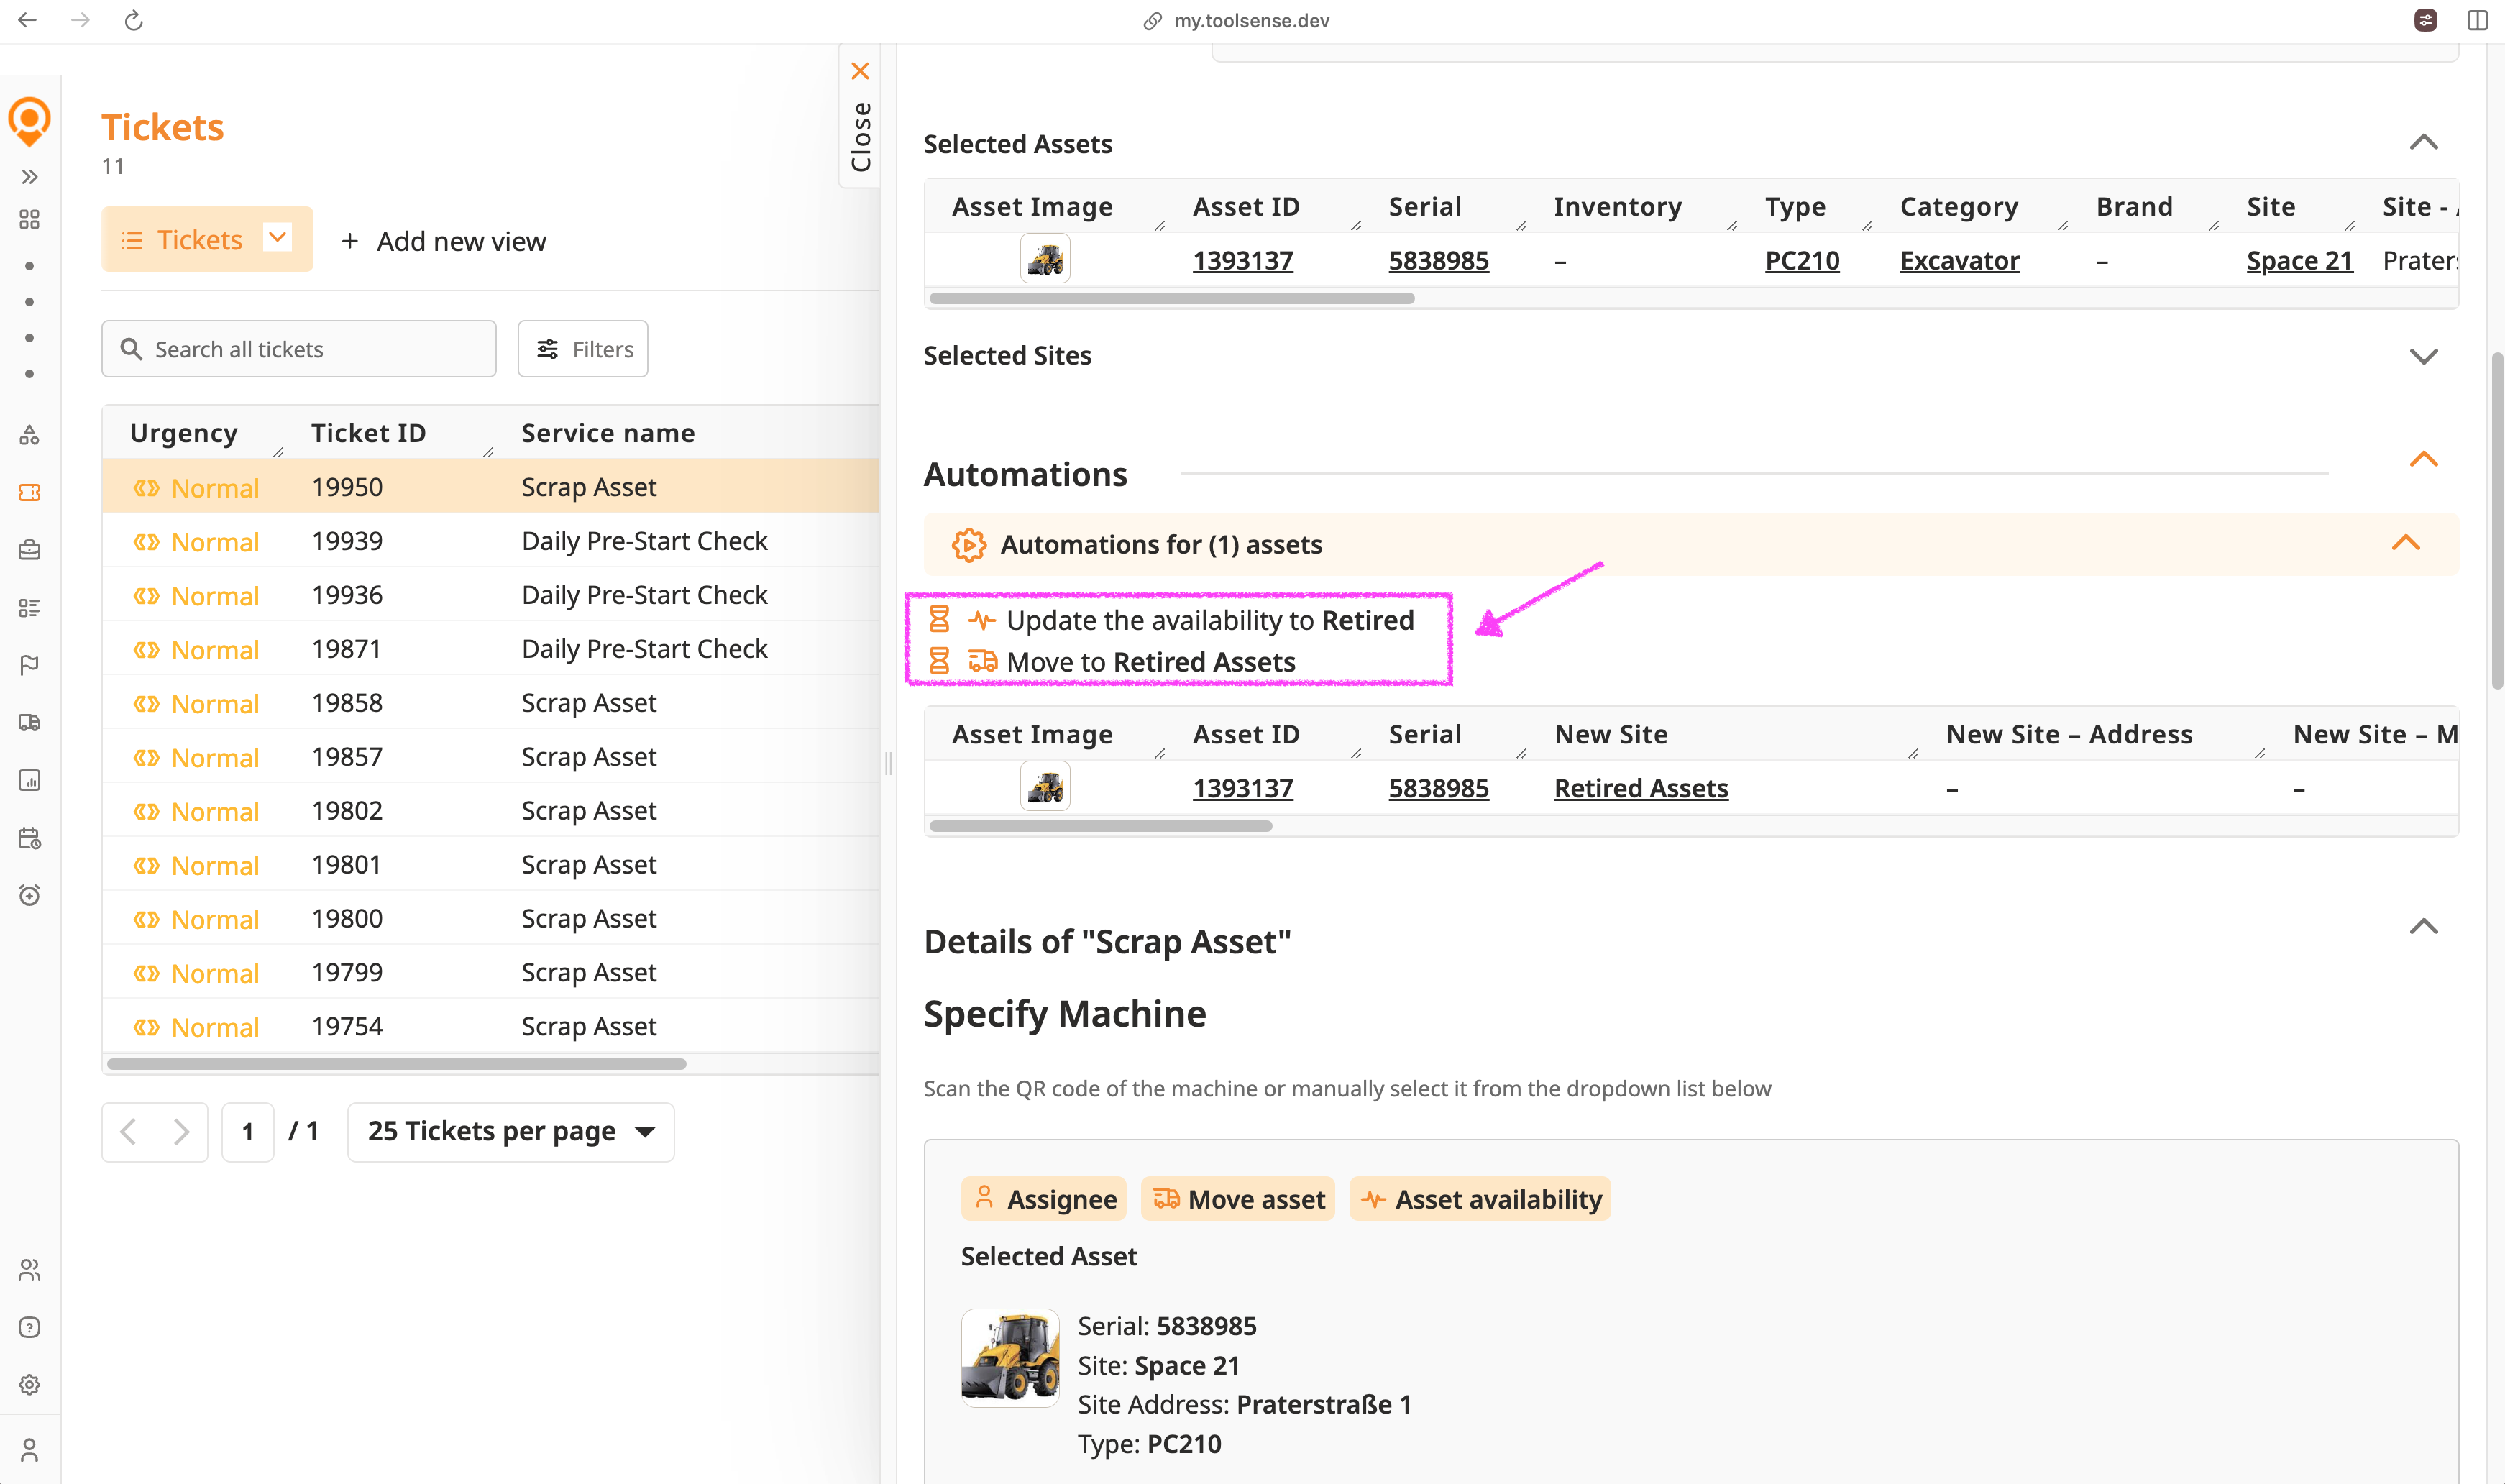
Sometimes, automations may not run upon ticket submission, such as when you choose for an automation to only start upon ticket closure e.g. Move asset only when the ticket is closed, in this case, the automations are still logged in the generated ticket. However, they would have a pending / waiting sign and would only start running upon closure of the ticket
Additionally, you can also see information about the automations on the Email responses and the PDF generated for this ticket